My name is Charlotte, sometimes known as Ms Lottie, occasionally as The Slightly Mad Quilt Lady. This is my blog, where you'll find me writing a lot about my quilting and textile arts and a little about my family's life in a small seaside town in New Zealand. Haere mai!

Monday, May 19, 2014

Show Notes from Podcast Episode Seven - All About the Boat.

This episode is all about the boat.  Hopefully I answer some questions about why, and how and what. There is a little bit of quilting sprinkled through the podcast and some listener/commenter feedback, but mainly it's boat, boat, boat.  Don't say you weren't warned!


Click here for Episode Seven at Podbean.

Here is The Slightly Mad Quilt Lady at iTunes.

Hope you enjoy it!  Please leave me feedback and comments and any questions here - I really appreciate them.

Sunday, May 18, 2014

Basting the Beast


Well, you guys voted and so I took on the challenge.  The giant blue and white quilt is basted, my knees are busted and I've pretty much worked out how I'm going to tackle the quilting designs.  And now I need a cup of tea.

Thursday, May 15, 2014

The boat tour. Welcome aboard!

Warning - this is a picture heavy post. 


 Lots of people are pestering me for more pictures of our new home.  And I am nothing if not obliging!  The picture above is Cerego berthed at the boatyard dock.  That's my husband beside her, so you can get an idea of scale.  She is a wooden boat, built in 1943 for the Australian Navy and was meant to be used as a mine sweeper.  She is 20.1 metres long, which is about 66 feet.  The rust is not from her structural bolts - don't worry!


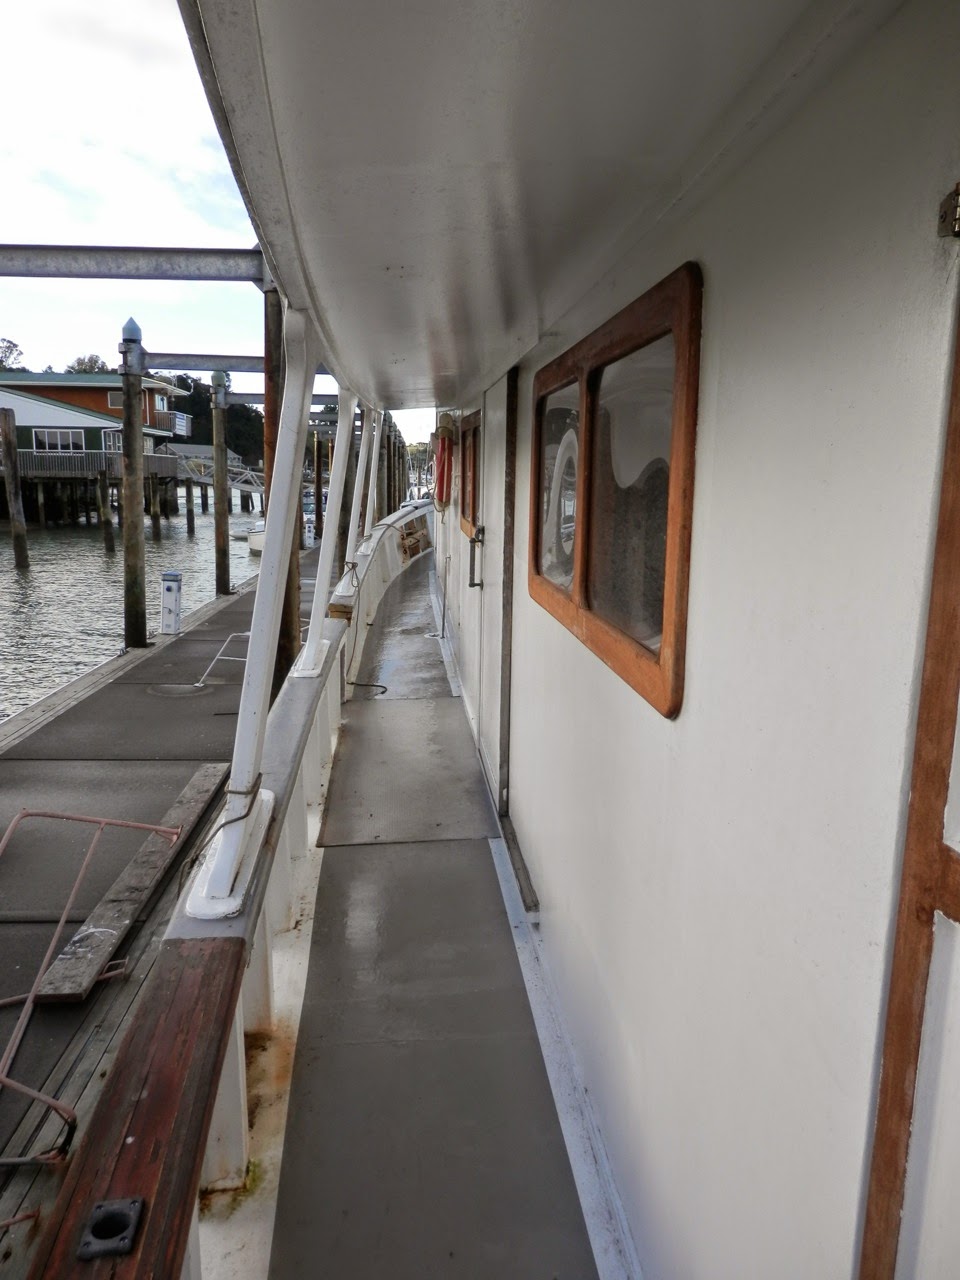
When you climb up the left (port) side you are on this long narrow walkway.  And then you walk around the back (aft - I'm going to be all nautical jargon soon!) and then...


you hit the back deck.  Nothing very exciting here, except a ladder and a hatch.  Ladder leads to top deck, I'll take you up there soon, hatch leads....


down to a storage type locker.  Large, dark and dingy.  It has water storage barrels and other junk in it at present.


When you walk in through the back door, you see the main cabin, which is in the picture above and below.  Above, in the corner with the rubbish bag, is probably where my sewing table will be set up.  You can see the doorway that leads forward to the galley and wheelhouse.


The picture bove is the other end of the same room.  The glass door leads in from the back deck.  The white door is the side door and there is a matching one on the other side.  There is also a matching couch on the other side.  The hatch in the floor is how you get below to.....


the yucky and really rough cabin that will be bunk rooms and play room for the kids.  At the front of this cabin is the door leading to the engine room, you can see that below. 


The areas below decks are where the work really needs to be done.  Panelling and painting and walls and bunks and portholes and light prisms.


So come back up out of the kid's room into the main cabin and walk forward to the galley.  This is the nice part of the boat.  There is a microwave, electric oven, gas hob, decent sized fridge-freezer and, best of all, a good-sized pantry.  The photo below is looking back toward the main cabin.


Carrying on forward toward the wheelhouse, you pass a little narrow (and steep) staircase.


If you head down this staircase (almost a ladder really) you get to the forward cabin.  Another area that needs major work.


This icky looking bunk will go and be rebuilt in a more efficient way.  Lots of painting etc again.


If you turn around, the photo above shows what the back of the cabin looks like - usually without the silly lad making faces!


Above is the wheelhouse.  It all looks 'proper' up here, like what you expect a boat to look like.


What a about a bathroom?  No, we don't have to hose off with saltwater!  Down the other side of the boat (starboard) is a little cupboard cabin.  Internally this sits between the galley and the main cabin.


And inside this little cabin is an almost full sized shower and toilet.  Yay!  If you've ever used a standard boat toilet, you'll know why this is big deal.


Back out onto the back deck, now head up that ladder.


And you reach the top deck.  The photo above is looking back toward the ladder.  This will eventually have a handrail around the sides, and Hubby has plans to put the spa pool up here.....yes, I said spa pool!  We have a little plug in portable one that he thinks we need.  I'm not so sure.


Right at the front of the top deck, you look over and down and you get a grand view of the anchor chains and winch.  You're standing on top of the wheelhouse.

So, I hope you enjoyed the tour.  I'll write more soon about why we are embarking on this adventure.

Wednesday, May 14, 2014

Where will I put the pets?


Today, if all goes well, and I see no reason it shouldn't, we become the owners of a boat.  A pretty big boat, but not as big as my house.  And that is significant, because the plan is that we move onto this boat and live on it for a while.

WHAT?!  When did this all happen?!  Well, I'm going to write more about this, but one of our first considerations was where do we put the pets?

Part of what decided us to buy the boat was the availability of a cheap berth in a convenient location.  We have two dogs.  Sam is very old and sits on her mat all day, but Emma is younger, dopey and super enthusiastic.  We won't be moored out in the water, so we will be able to step off the side and walk the dogs easily, and Emma will probably go to work with my husband every day.  His work will be a very short bike ride down the road.

So it may take some adjustment, but I think we will manage with the dogs.  We do have options of placing them with friends, but that wouldn't be our first choice.

I think the the cat will transition easily, it will just mean a litterbox.  And hopefully he'll keep the seagulls off the roof!


The chickens, ducks, sheep and cows will either have to find new homes (some of them were planned for the freezer shortly anyway) or we will 'gift' them to our tenants.  That's another thing we have to do, find tenants for our lifestyle block.  Oh man, the list of to-dos is huge!

I will try and post pictures of my new abode soon.

Saturday, May 10, 2014

Little Zip Pouches


I've been sewing a few zippered pouches up out of bits and pieces.  They are so quick and easy.  I remember when I was intimidated by zippers, but they're really not that scary.   And the pouch tutorial that I follow has tabs on the end of the zip so it is perfect for beginners - not too tricky.


They are lined, so there is a tiny bit of hand sewing on the lining to finish them off, but that only takes seconds.  The fabric pieces aren't big so it can use up scraps and I often pick up perfectly good zippers at op shops, so these pouches can be a frugal make too.


This is the tutorial I use (although I know this off by heart now, I've made so many):  http://www.craftbuds.com/easy-lined-zipper-pouch/


There are a million different zipper pouch tutorials out there.  Just google it and pick whichever one takes your fancy.  Seriously, they are easy, satisfying, use up scraps and make great gifts - give one a go today!