My name is Charlotte, sometimes known as Ms Lottie, occasionally as The Slightly Mad Quilt Lady. This is my blog, where you'll find me writing a lot about my quilting and textile arts and a little about my family's life in a small seaside town in New Zealand. Haere mai!
Showing posts with label machine quilting. Show all posts

Monday, August 31, 2020

I'm a BERNINA Q 20 Ambassador for New Zealand!

It’s been seven weeks since my new baby came to live with me….my new BERNINA Q 20 sit down long-arm quilting machine!


The BERNINA Q 20 is a quilting machine with a 20 inch throat. You sit on a chair to use it and guide the fabric under the needle, just like free-motion quilting on a small domestic machine. You can also put the Q 20 on a frame and use it like a stand up long-arm, where you guide the machine over the fabric. BERNINA also makes a Q 24 (with a 24" throat) that is specifically designed to be used in a stand up frame.


I have been a BERNINA convert since I bought my first ‘real’ sewing machine 15 years ago – a BERNINA Aurora 440. BERNINA stole my heart with the quality of their machines, the beauty of the stitches and the ease of use. So when the lovely crew at BERNINA NZ contacted me and asked if I’d consider becoming a BERNINA Ambassador for them, you can guess what the answer was…hellooooooo dream role!


My role as an ambassador is to share my experiences using the machine, to publicise any neat and unique features that I particularly love and to basically 'share the love' by showing you all what I create with the machine. You might also see me sometimes at shows where BERNINA has a stand (cool! I love demoing) and perhaps even doing a teaching tour or two.


*Sneaky advance notice - teaching tour coming up in October - watch this space!*


So here’s me sharing the love with pictures of the day she arrived.


Nick and Sandy came up from BERNINA Sewing Centre in Whangarei to deliver and install the machine for me. They were equally excited for me, and so helpful, with lots of tips.


My Q 20 sits in a Horn table. These tables have been designed particularly for this machine as an option for smaller spaces; they are large and pretty robust tables, but foldaway (with the machine still on them) for effective space saving. Nick tells me that most people opt for these tables now, but there is also the choice of a Koala table; a very solid table that has the option to expand larger than the Horn.


Apparently in the U.S. you can get fancy electric tables that lift up and convert from seated height to standing height. I’ll keep my eyes peeled to see if they ever come to NZ.


Anyhoo. Back to installation day. I was shown how to use the machine, how to set my bobbin tension with the nifty little tension gadget, how to oil and clean her (super easy), and how to use the fancy-pants needle threader. Then it was practice time. 


With any new machine it takes time to get to know it. For example, it took me a little while to get my movements coordinated with using the kickback on the foot pedal to lift the needle and then the button on the screen to lift the foot because it’s a different set of movements from my other machine. But once you get quilting, the free-motion movements are all the same and it just flows like silk!


It has also taken me a little while to get used to the BSR – the BERNINA stitch regulator function. My BERNINA Aurora 440 has a BSR, but I never really use it. When I first bought that machine, I was just learning to free-motion quilt and it felt like learning to use the BSR was just as much effort as learning to free-motion without it. Over the years I have mastered free-motion quilting and can easily regulate my stitch length without needing a BSR. But I was determined to try it and get to know it well on the Q 20 – if I’m ever going to be demoing the machine I have to know what I’m talking about, right?!


And now I LUUUUURVE it! She has three BSR modes. BSR 1 regulates your stitch length to the speed you move the fabric but also stitches in place when you stop moving the fabric. BSR 2 is the same as BSR 1 but with no idling stitching. BSR 3 is a basting stitch, which you can set to do one, two or four stitches per inch. I’m looking forward to trying the four stitches per inch with a heavy thread to imitate big-stitch hand quilting.


The BSR helps with keeping the quality of my stitches beautiful. It really helps with ruler quilting, which I’m just starting to explore, and it just makes life a little bit easier, giving you more energy to spend on creating beautiful quilts rather than worrying about stitch length. 


If you follow me on Instagram, you will have seen many of my practice pieces. I’ve made several bassinet quilts, as they are a good size for practice sandwiches, and then I can donate them to the maternity unit once they are finished. I've also been working on some smaller projects with intensive quilting, like the swallow below.


But yesterday I finished a little sample that I made entirely on the BERNINA Q 20. It’s a wholecloth quilt, thread sketched, then coloured with water soluble pencils, and fixed with a textile medium. I call it Dragon Moon.
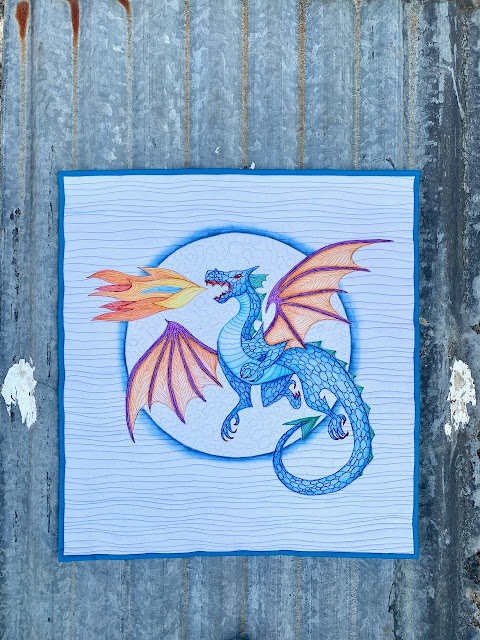


Size is 18 1/2 inches wide by 20 inches tall. It's intensively stitched, but the BERNINA Q 20 handled that with ease. 


Here's the back. I thought it would be interesting to use black fabric to give it a totally different look. I usually use the same colour threads top and bobbin so I almost get a two-sided quilt.


And a couple of detail shots for you. My meandering on the moon looks a little odd closeup, but I was trying to go for an irregular pocked moon surface, rather than a beautifully even meander, not quite sure I achieved it! I'm super happy with the scaling pattern on the body, and the pattern I used on the wings (although I didn't get much of a closeup of that.)


In conclusion, I'm delighted with the machine. She is lovely to use and creates a lovely stitch, just like I've come to expect from BERNINA. I'm really excited to be able to be part of the BERNINA family and I look forward to being able to show you all the projects I create with the Q 20. 


P.S. Next time I'm asked to fill in my occupation on a form, do you think I could get away with writing 'Ambassador'?!

Friday, July 7, 2017

Bernina Walking Foot Maintenance

Here's why I like social media - and in particular, Instagram!

A couple of days ago I noticed my walking foot was jamming up a little.  I've been entrusted with quilting the raffle quilt for our quilt guild and I want it to be as perfect as possible so I was watching carefully and I'd see and feel the stitches getting smaller as the foot struggled to pull the quilt through.  The grabby bits (real tech speak!) were getting stuck at the end of their grab and weren't releasing to come forward and make another grab.

I undid the foot and had a good look but I couldn't see anything obvious.  So I took some photographs so I could put the thing back together if it fell into a million pieces, grabbed my screwdriver and started to unwind the one screw I could see.


All that did was loosen the foot prongs so I could take the actual foot part off the foot.  But that allowed me to fiddle with the prongs and rollers a bit closer and I found that one of the rollers was seized.  I gave everything I could a clean and I oiled the rollers, but still no luck.  You can see me pointing to the roller in question in the photo below.


So I turned to Instagram and posted a little help me please video and tagged the good people at Bernina in.


Within a short while I had a suggestion about working the oil in by turning the roller with my finger or tweezers.  I tried it and it seems to have worked!  And Bernina even contacted me again to ask if I had had any luck.  How awesome!

I've had my Bernina Aurora 440 for at least 10 years and I use it constantly and I absolutely love it (I'm not being paid to say that, but hey Bernina if you're listening - I'm totally open to sponsorship!).  My walking foot has travelled so many miles that I thought there was a good chance that I'd worn it out.  But no, it just needed a bit of TLC and it keeps on trucking.

So my suggestion to those of you who have Bernina walking feet, is to oil the rollers regularly and then you'll avoid them seizing like mine did.  If it has seized, work the oil in by oiling and then turning the roller with your finger or tweezers.  Give the oil some time to soak in too.  I used my clear sewing machine oil, which should be fine enough for the job.  Wipe it well so you don't get oil on your precious quilt and then you are good to go.


So here's a big thank you to @berninanz on Instagram for responding so quickly, providing me with fantastic help and letting me carry on with quilting the guild's precious quilt.

And thank you to the other's who offered suggestions and even the loan of their walking foot!  What a fab community.

Friday, June 6, 2014

How to machine quilt around hand embroidery.


Recently I've been quilting a secret-squirrel project.  I think I'm safe showing you the snippet above, but you'll have to wait to see the whole thing, sorry.

I included a little bit of backstitch embroidery and thought I'd share a few things I've learnt about machine quilting around hand embroidery.

  • Don't quilt over your embroidery.  Just like beautiful appliqué is spoilt by an all-over quilting design, so is stitchery.
  •  Use a complimentary design.  A vine and flower design is good for floral quilts, but a square spiral might look a little odd.  Stippling and other filler designs work well to push the background back and highlight your embroidery.
  • Quilt through the design if appropriate.  You can see in the photo above that I've quilted the inside of some letters but not others.  The ones I haven't quilted stand out and I'll need to go back and fill them in or they will draw your eye when the quilt is on the wall.  
  • Go slow when you are getting close to your embroidery.  You can run your quilting line down along your embroidery edge and then move back out rather than stopping and starting your quilting every time you get to the embroidery.  You can even use a stiletto to gently move your embroidery stitches out of the way if they are not too small and tight.
  • If you do accidentally quilt over your embroidery, an appropriately coloured fabric marker is your best friend!  Use a white gel marker if your embroidery is white or cream and your quilting thread is dark.
What about you?  Have you ever quilted around hand embroidery?  Do you have any other tips to add?