My name is Charlotte, sometimes known as Ms Lottie, occasionally as The Slightly Mad Quilt Lady. This is my blog, where you'll find me writing a lot about my quilting and textile arts and a little about my family's life in a small seaside town in New Zealand. Haere mai!
Showing posts with label quilt binding. Show all posts

Wednesday, September 1, 2021

Single fold mitred quilt binding

I've posted a photo on Instagram of a little art quilt with a single-fold mitred binding in progress and asked whether people wanted to see process photographs to explain how I do it. The answer was yes, so I'm writing it out here (hello blog! Long time, no see!) to gather my thoughts. And typing is waaaay easier on a keyboard rather than a phone screen 😁

So here's the original photo, I was feeling smugly satisfied at how tidy it was looking:


Onwards! Here's how to do a narrow, single thickness (or single-fold) mitred quilt binding:

First, cut your strips. I've cut mine 1 and 1/4 inches. Which makes it a nice flat 1/4 inch on the front. You could try 1 inch for something even narrower if you liked.


Cut enough strips to enclose the circumferance of your quilt with a good overlap of the strips ends by about 5 inches. Join your strips with mitred joins. Open the seams and press flat.


Sew the binding strip to the front your quilt, right side of strip to the front of your quilt. Start (with a couple of backstitches) in the middle of one side of your quilt and leave a free hanging tail on the binding strip of about 5 inches, just like using a traditional double fold binding. I use a slightly narrower than 1/4 inch seam allowance, using the markings on my walking foot to line it up. If you cut your strip less than 1 and 1/4 inches wide, you'll have to sew even narrower. 

Stop sewing before you reach the end of the side (see pic above). How far away to stop depends on the width of your seam allowance, if you are sewing with 1/4 inch, then stop 1/4 inch away from the end. If you're sewing a 1/8 inch seam allowance, stop 1/8 inch away. If you don't want to measure, the easiest way to eyeball it is to fold the binding strip up at a 90 degree angle, crease it, unfold it and then stop at the 45 degree crease, backstitch a couple of stitches.


Take your quilt out from under the needle, fold binding strip up at a 90 degree, then fold it back down along the next side to stitch. Like the photo below. This forms your mitred corners when you fold it round to the back, so keep them as neat and precise as you can (no wine, it's too early to celebrate yet!)
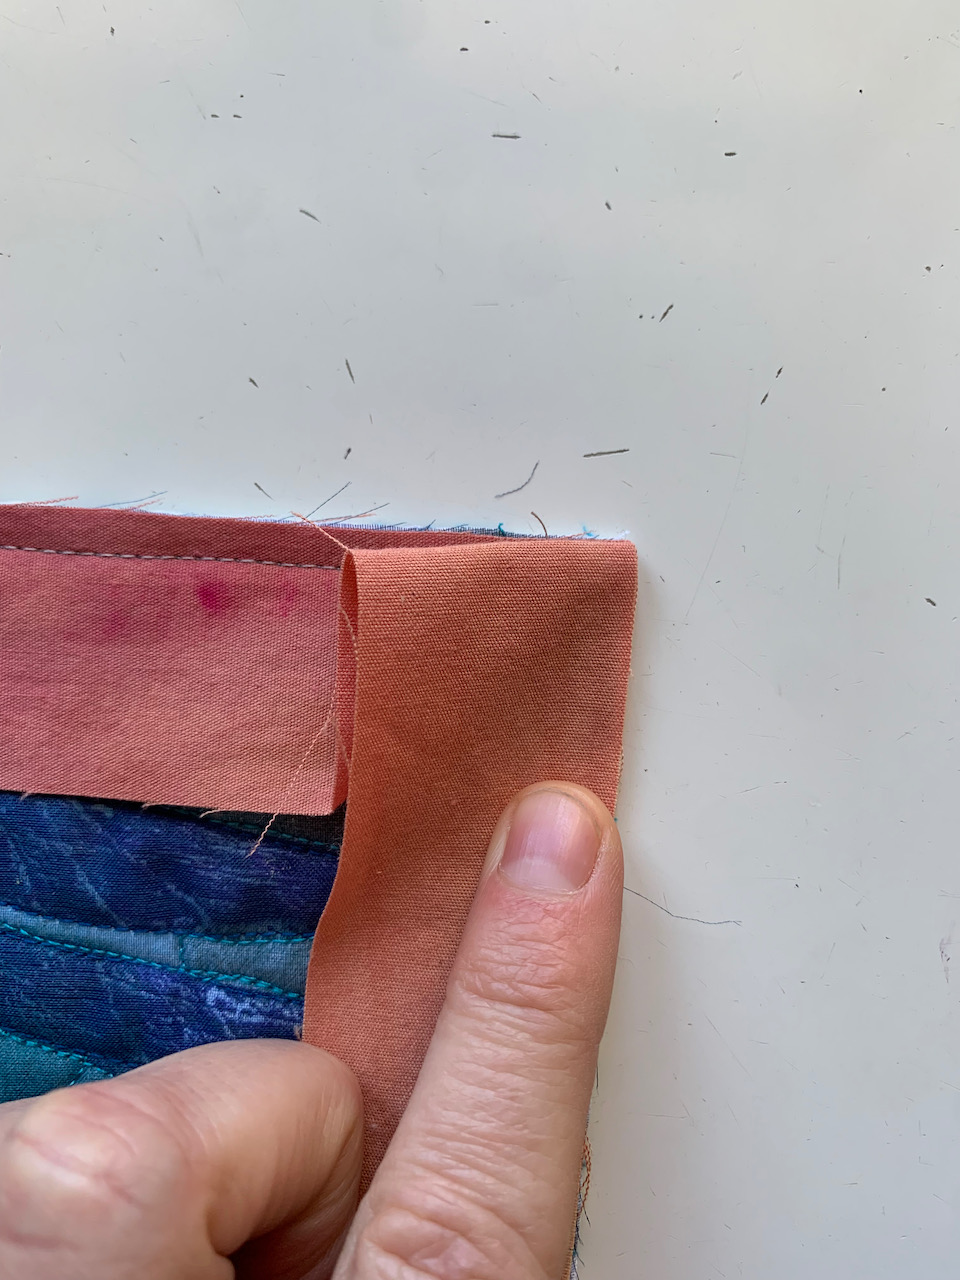

Finger press it flat and neat. Then stick it back under the machine.


Start stitching right from the edge and carry on down that edge. In the pic above you can see I'm lining up my quilt edge and my binding strip edge with the inner edge of the inner 'prong' of my walking foot, not using the 1/4 inch marking as that would be too wide. 

Once again, stop before you reach the end of that side and repeat the steps above. Rinse and repeat four more times, until you are heading back down the same side you started on.


Stop sewing about 5 inches from where you started and take a few backstitches. Now, if you have a foolproof method of joining binding strips on your usual double fold binding, go for it, it should work for single fold as much as it does for double fold. 

If not and you want to learn my no-measure way, pay attention! And maybe zoom in on that pic above 😉

Pinch your strips together like in the pic and use a sharp pin to take a couple threads in each strip, right about where the seam allowance would hit (look at where my thumb is.)


Once you have a couple of threads with the pin joining the strips together, you should be able to bunch the quilt up a bit and twist the strips out sideways so they cross right sides together at an angle. This is why you can only take a couple of threads with the pin, or the strips won't pivot nicely.


Stich the strips where they cross, from the point of the top angle to the bottom point, remove the pin before you hit it, as your stitching line should go right through where it catches the fabric. It might help to use your 1/4 inch foot, not your bulky walking foot to do this.


Once you've sewn the strips together, you should be able to pivot them back against the edge of your quilt. Check that they lie smooth and flat and then trim them (as the pic below) and press the seam open. In the pic below you can see that I have a strip join seam quite close to the end join. Not ideal, if you can cut your strips a little shorter or longer to avoid this it would look better (but I ain't perfect...!)


Sew the last bit of the seam to meet up with where you began, backstitching at the beginning the end.


And here's what it should look like now. All neatly sewn in one continuous strip to the front of your quilt, with mitred corners, all ready to turn to the back. 


Press your strip out from the front of your quilt. 
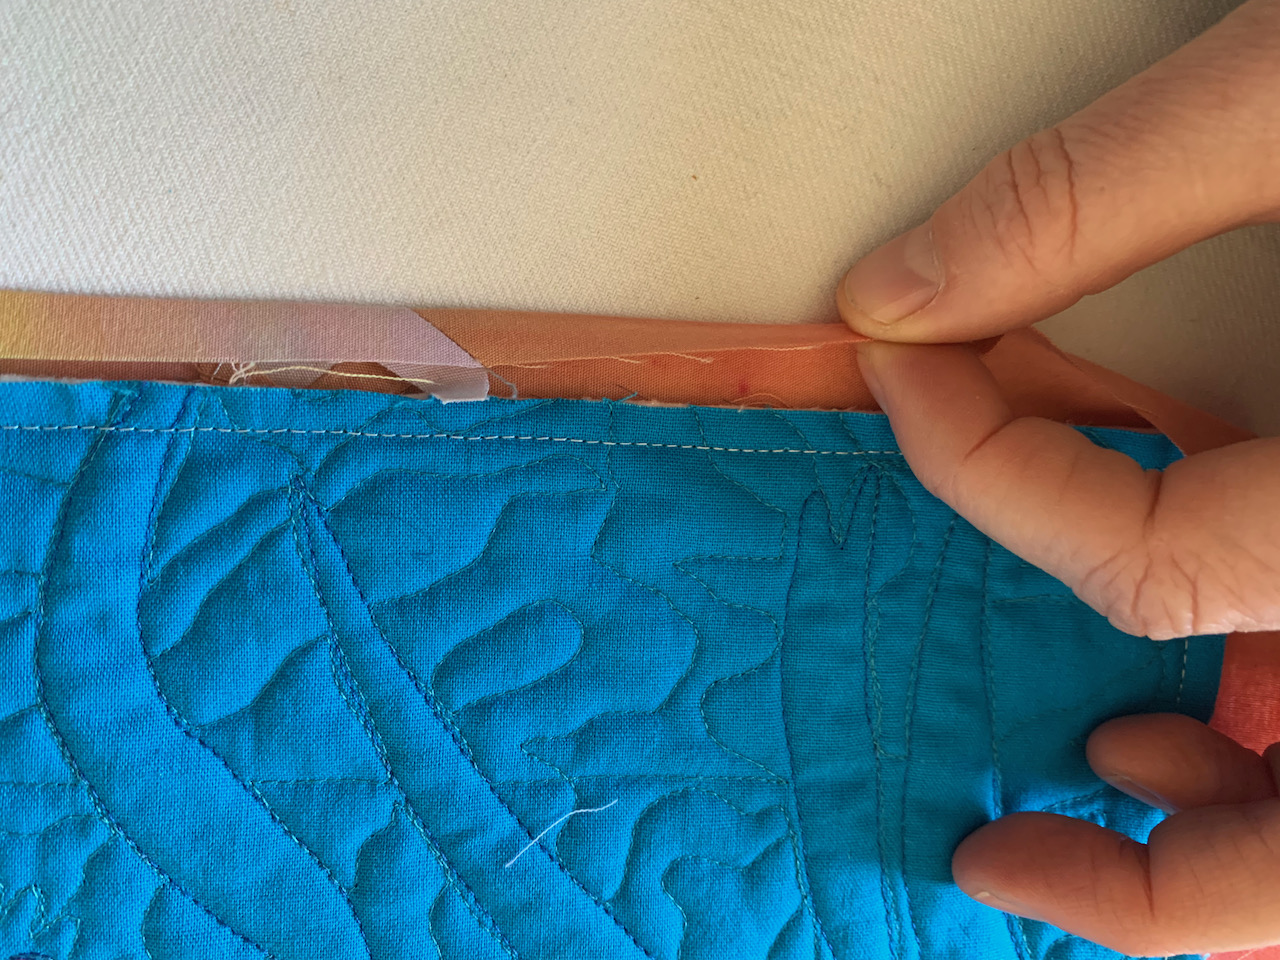

Then flip the quilt over (right side down) and fold the raw edge of the strip in towards the quilt (but not OVER the quilt) and press. You won't really be able to do the corners quite yet. 

When you have done the sides, working as close to the corners as you can, slide your finger along the strip towards the corner, folding in the raw edge as you go, and then into the corner. The binding strip will kinda stand up and form around the corner. You will then be able to fold one side over one edge of the quilt, then the other side over the other edge of the quilt and make a nice neat mitred corner, covering the machine stitching lines as you go.  

The following sequence of pics show the process ( I really should make a video of this!)

Please don't judge the state of my pressing surface....😝

Slide finger along, folding in raw edge as you go towards the corner.

Hit the corner and the binding strip stands up.

Fold one side of the strip over the edge of the quilt, covering the machine stitching lines.


Fold the other side of the strip over the other side of the quilt and form a nice mitre in the corner

And that's it! Now you can press again, pin, and hand-stitch the binding neatly (or messily as you prefer) to the back of your quilt. 


Above is with the binding just pinned, not stitched. It lies flatter and neater when the stitching is done.


And here's me hand-stitching it with a hem stitch to the back. I take a couple of stitches at the corners too, just for added neatness and security (and because the quilt police once told me I should.) You can see that it is slightly wider at the back, which means it neatly covers the line of machine sewing from sewing it onto the front.

I hope this makes sense. Please ask any question that you need to for clarification.
 

Thursday, May 19, 2016

How to bind a funny angled quilt.


This is a lozenge shaped baby quilt that I made for a friend.  When all the triangles were laid out on the floor I liked the look of it so much that I didn't want to square it up.  So it can be a funky playmate, or folded back for a bed quilt, a snuggly quilt for the car - anything really, but it meant that when it came to bind it I was dealing with non-right angled corners (120 degrees to be precise).


But it's pretty easy really to make nice neat mitred corners on these angles, just follow similar steps as to usual and you'll be done.


Sew the folded binding strip to the front of the quilt with a quarter inch seam using your walking foot just as you would for a square quilt.


Before you get to the first corner, put a pin in parallel and 1/4 inch away from the next side of the quilt.


Sew up to the pin and then take a couple of back stitches.  Take the pin out and take the quilt out from under the needle.


Fold back the binding strip away from the quilt so the raw edges of the binding strip are 180 degrees from the raw edges of the next side of the quilt.


Fold the binding strip back down so the raw edges of the quilt and the binding strip are aligned.  You will have this neat little tuck that you can see in the picture above (pin it if you need to).


Start sewing right from the edge of the quilt, taking a couple of back stitches across the tuck.  Continue sewing along until you get to the next corner and repeat the steps above.  Join the ends of your binding strips as you usually would.


When you fold your binding strip over to the back of the quilt, you will get a neat mitre in your corner on the front of your quilt.


And a neat mitre in the corner on the back of your quilt.  Pin (or clip using Clover wonder clips - I love them for binding) and hand sew your binding down.

Easy peasy!  So don't be scared of using different angles in your quilts or table runners.  The mitre works out just the same.


The bright orange backing is a built-in safety feature.  You never know when you'll need a high-vis blanket for signalling helicopters...

35" wide and 54" long point to point.

Saturday, February 6, 2016

How to finish the edges of mini textile art

I've been making some teeny little wall hangings.  And by teeny, I mean a few inches across.


Finishing the edges of these little artworks is always a bit tricky.  I use a heavy weight vilene in them to stabilise and stiffen them so they don't really lend themselves to a traditional binding, and they are too small for that anyway.

I have used a close zig-zag stitch along the edges but that takes a lot of thread and can gobble the corners if you aren't careful.  And I have messy backs from my embroidery that I'd like to cover too.


Then my talented friend Shirley let me in on how she finishes her bookmarks that she makes.

First, you iron a fusible web like vlisofix, mistyfuse or steam-a-seam onto some coordinating fabric.  Then you trim a piece of that fabric to about a quarter of an inch bigger than your little piece of art.


To form a hanging loop so you can display your artwork, use a piece of embroidery thread and take a large loose stitch through the backing fabric, fastening it with knots on the wrong side.


Tack down the fused fabric on the back of your artwork then trim the corners like in the photo.  Fold the edges of the fused fabric tightly over to the front of the work and fuse them down.  Fuse the back securely.


Stitch along the folded edges to secure.  You can use a contrasting or matching thread, a decorative stitch or plain machine stitch, or you can do what I did and use an embroidery thread in the bobbin (I'm using my hand-dyed silk/cotton blend) and work from the back to make it a feature.


Make sure you remember to sign and label your work, then hang it on the wall to enjoy.  These three are now keeping my hand-dyed threads company in my studio and gallery.


The middle one (Tree Hug #2) is 2 1/2 inches by 3 1/2 inches and the other two (Tree Hug #1 and #3) are 3 inches by 3 1/2 inches.  They are for sale at $12 NZD each or $30 for the set.  Email me if you are interested!

Edit:  These are now sold, thanks for your interest.

Wednesday, March 18, 2015

How to tie a knot for hand-sewing

Want to learn the magic of tying a neat know when you are sewing on your quilt bindings?

I used to tie ugly knots.  Yup, being a mostly self-taught sewer and quilter, I didn't know there was a technique.  I'd get myself in a tangle and it used to annoy me.  I'd seen people tie knots fast and neatly but just didn't know there was a trick to it.

One day I got around to learning how.  I can't remember who taught me, but my knots are neat and tidy and look like a little bit of magic when I do it fast.  So thank you anonymous teacher!

I've taught a few people now too and it always makes my day when they get it.  So I ventured into the realm of video tutorials and I've uploaded a knot-tying video to YouTube.


Enjoy!

Tuesday, July 1, 2014

What's your favourite part of making a quilt?

What's your favourite part of making a quilt?

I know lots of people don't like hand stitching binding, but I do.  There is something about each stitch taking you closer and closer to a finish.  Bindings make a huge improvement in the look of the quilt too.  Well, every step makes a huge improvement in the look of the quilt, but binding is just that final 'wow' step.  And let's say it, there is something about hand work too - repetitive, soothing, relaxing.  Another thing about hand stitching a binding is how rarely I need to unpick.  Maybe that's a silly reason to like it so much, but it's true!


I'm not a huge gizmo and gadget girl, but one thing that has made my binding process even more pleasant is using Clover wonder clips.  I won a packet (see, I doubt I would have bought them myself) and I love them.  I used to get pricked by pins if I pinned my binding down, or a sore hand from holding the binding if I didn't pin.  Now I get neither.

Note: I've no affiliation to Clover, nor Grandmother's Garden, which is the shop the link takes you too, it was just the first shop to come up when I googled Clover wonder clips New Zealand.

Maybe the other reason I like binding so much is that it means I've made all the hard design decisions.  It means that I'm either happy with how the quilt has turned out, or, if I wasn't happy, at least it will be finished and done with shortly.

What's your favourite part of making a quilt?  And then, probably more telling, what's your LEAST favourite part?!


Now, just for kicks and giggles, I was alerted by a friend that my mug shot was in the NZ Quilter magazine this month!  NZ Quilter is our first and foremost quilting magazine in New Zealand, so I was pretty stoked to see I had a little write up.


Saturday, March 2, 2013

The day of B's


Today I'm brewing,


baking,


and binding.

Brewing:  a ginger beer bug.

Baking:  two ginger-crunch cakes, one for the School Regatta tomorrow, one for the pantry tins.

Binding:  My tree of life quilt.  Do you like my faux piping?  Or would you call it a flange?  A decorative edging?  Whatever you call it, I like it, and I especially like that I got it pretty neat and tidy.  Two corners are done, two to go.  Do you measure your progress on hand-stitching binding like that?