My name is Charlotte, sometimes known as Ms Lottie, occasionally as The Slightly Mad Quilt Lady. This is my blog, where you'll find me writing a lot about my quilting and textile arts and a little about my family's life in a small seaside town in New Zealand. Haere mai!

Monday, August 31, 2020

I'm a BERNINA Q 20 Ambassador for New Zealand!

It’s been seven weeks since my new baby came to live with me….my new BERNINA Q 20 sit down long-arm quilting machine!


The BERNINA Q 20 is a quilting machine with a 20 inch throat. You sit on a chair to use it and guide the fabric under the needle, just like free-motion quilting on a small domestic machine. You can also put the Q 20 on a frame and use it like a stand up long-arm, where you guide the machine over the fabric. BERNINA also makes a Q 24 (with a 24" throat) that is specifically designed to be used in a stand up frame.


I have been a BERNINA convert since I bought my first ‘real’ sewing machine 15 years ago – a BERNINA Aurora 440. BERNINA stole my heart with the quality of their machines, the beauty of the stitches and the ease of use. So when the lovely crew at BERNINA NZ contacted me and asked if I’d consider becoming a BERNINA Ambassador for them, you can guess what the answer was…hellooooooo dream role!


My role as an ambassador is to share my experiences using the machine, to publicise any neat and unique features that I particularly love and to basically 'share the love' by showing you all what I create with the machine. You might also see me sometimes at shows where BERNINA has a stand (cool! I love demoing) and perhaps even doing a teaching tour or two.


*Sneaky advance notice - teaching tour coming up in October - watch this space!*


So here’s me sharing the love with pictures of the day she arrived.


Nick and Sandy came up from BERNINA Sewing Centre in Whangarei to deliver and install the machine for me. They were equally excited for me, and so helpful, with lots of tips.


My Q 20 sits in a Horn table. These tables have been designed particularly for this machine as an option for smaller spaces; they are large and pretty robust tables, but foldaway (with the machine still on them) for effective space saving. Nick tells me that most people opt for these tables now, but there is also the choice of a Koala table; a very solid table that has the option to expand larger than the Horn.


Apparently in the U.S. you can get fancy electric tables that lift up and convert from seated height to standing height. I’ll keep my eyes peeled to see if they ever come to NZ.


Anyhoo. Back to installation day. I was shown how to use the machine, how to set my bobbin tension with the nifty little tension gadget, how to oil and clean her (super easy), and how to use the fancy-pants needle threader. Then it was practice time. 


With any new machine it takes time to get to know it. For example, it took me a little while to get my movements coordinated with using the kickback on the foot pedal to lift the needle and then the button on the screen to lift the foot because it’s a different set of movements from my other machine. But once you get quilting, the free-motion movements are all the same and it just flows like silk!


It has also taken me a little while to get used to the BSR – the BERNINA stitch regulator function. My BERNINA Aurora 440 has a BSR, but I never really use it. When I first bought that machine, I was just learning to free-motion quilt and it felt like learning to use the BSR was just as much effort as learning to free-motion without it. Over the years I have mastered free-motion quilting and can easily regulate my stitch length without needing a BSR. But I was determined to try it and get to know it well on the Q 20 – if I’m ever going to be demoing the machine I have to know what I’m talking about, right?!


And now I LUUUUURVE it! She has three BSR modes. BSR 1 regulates your stitch length to the speed you move the fabric but also stitches in place when you stop moving the fabric. BSR 2 is the same as BSR 1 but with no idling stitching. BSR 3 is a basting stitch, which you can set to do one, two or four stitches per inch. I’m looking forward to trying the four stitches per inch with a heavy thread to imitate big-stitch hand quilting.


The BSR helps with keeping the quality of my stitches beautiful. It really helps with ruler quilting, which I’m just starting to explore, and it just makes life a little bit easier, giving you more energy to spend on creating beautiful quilts rather than worrying about stitch length. 


If you follow me on Instagram, you will have seen many of my practice pieces. I’ve made several bassinet quilts, as they are a good size for practice sandwiches, and then I can donate them to the maternity unit once they are finished. I've also been working on some smaller projects with intensive quilting, like the swallow below.


But yesterday I finished a little sample that I made entirely on the BERNINA Q 20. It’s a wholecloth quilt, thread sketched, then coloured with water soluble pencils, and fixed with a textile medium. I call it Dragon Moon.
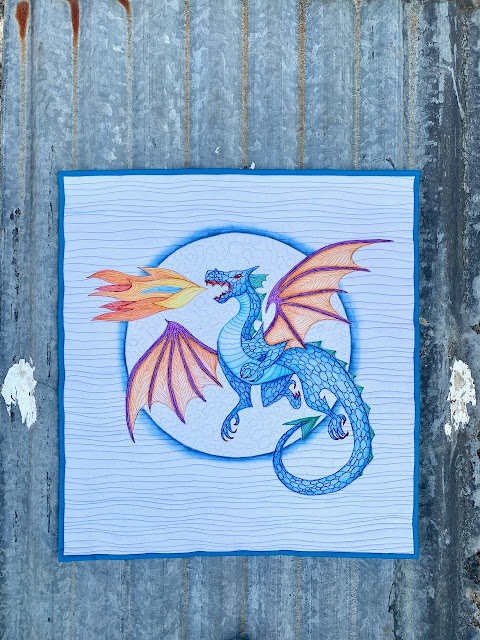


Size is 18 1/2 inches wide by 20 inches tall. It's intensively stitched, but the BERNINA Q 20 handled that with ease. 


Here's the back. I thought it would be interesting to use black fabric to give it a totally different look. I usually use the same colour threads top and bobbin so I almost get a two-sided quilt.


And a couple of detail shots for you. My meandering on the moon looks a little odd closeup, but I was trying to go for an irregular pocked moon surface, rather than a beautifully even meander, not quite sure I achieved it! I'm super happy with the scaling pattern on the body, and the pattern I used on the wings (although I didn't get much of a closeup of that.)


In conclusion, I'm delighted with the machine. She is lovely to use and creates a lovely stitch, just like I've come to expect from BERNINA. I'm really excited to be able to be part of the BERNINA family and I look forward to being able to show you all the projects I create with the Q 20. 


P.S. Next time I'm asked to fill in my occupation on a form, do you think I could get away with writing 'Ambassador'?!

Monday, June 29, 2020

Merit Award in the Aotearoa Quilters Aqua Challenge

Aotearoa Quilters runs a colour challenge every year or so, and this time around the theme colour was aqua. They also changed up the size (usually a 12" x 12" square) this time they chose a 12" x 16" rectangle in a portrait orientation. I confess to enjoying the rectangular shape more than the square, it's easier to work with design-wise. But I know squares fit together beautifully on an exhibition wall, so it's swings and roundabouts.

And I was delighted to win a merit prize! Those are the good emails to open. The unexpected ones that tell you you've won something (and not $7.3 billion from a nice man in Nigeria!)

All the entered quilts will be on show at the Taupo Quiltmakers exhibition called Pearls and Water. This is on at the Great Lake Centre, Taupo, October 2nd till October 4th and would be well worth a visit. 

When you think of aqua, what colour do you think of? Greeny-blue? Bluey-green? Teal? Kingfisher? Here's a screenshot of when I search for images of aqua colour - what a variation! 


So I did a colour pull of all my 'aqua-ish' fabrics to get more of an idea of what I had, and to see if anything sparked my ideas button.


As you may know if you've been reading my blog for any length of time, birds feature heavily in my quilts. I have been working with birds in flight recently so I decided to downsize the shapes I'd been working with and play with them on the surface of a piece of aqua hand-dyed fabric I found.


They fell into place so nicely, with such a great sense of movement, that the design didn't take long to finalise at all. The colours of each bird travels from dark teal to lightest sea foam, with a dark purple for some visual interest.


I know this is an absolutely terrible photo, but it gives you an idea of how I sometimes plan quilting lines. This is a photo of the quilt top, placed in a page protector and then drawn on with a dry erase marker.


I finished the quilt with a facing as I felt a binding would constrain the birds and you would lose the sense of them flying off into the distance. I named the quilt "Let Your Spirit Fly Free" in dedication to the first Covid-19 victim in New Zealand, who passed away around the time I was making the quilt.


I quilted it using my trusty domestic BERNINA Aurora 440 as the quilt was nice and small and this machine gives me great control over my free motion quilting. The threads are tied and buried. 

All the quilts will be for sale for $150, and I'd be pleased if it went to a new home. But I'd also be secretly pleased if it came back home after touring New Zealand, as it's one I'm really pleased with and it reminds me of the strange and difficult, but weirdly beautiful time that NZ's Covid-19 lockdown was for me.

The winning quilt and the other merit prizes can be seen on the Aotearoa Quilters Facebook page. I'd like to thank the sponsors who make the prizes possible, especially Quiltique who sponsored my prize. 

Tuesday, June 9, 2020

Skulls and Thorns

When I last spent some time writing in my blog, we were moving out of Level 4 lockdown for the Covid-19 pandemic, so it's quite fitting that now, when I've taken up my pen keyboard again, it is the first day of Level 1. New Zealand has NO active cases!

My desktop died a sad and sudden death a few weeks ago and that really put a halt to my intended regular blogging activity. I can do it on my other devices but it just isn't fun.

Anyhoo, here I am once again.

I have a video for you today. A little free-motion quilting video that I shot yesterday. It's fun videoing myself quilting, I like watching myself and figuring out how I could improve my own skills, or how I could better teach others from what I'm saying and pointing out.

The quilt I'm quilting is one I've been working on off and on for a little while. It started as a hand-stitching project and has evolved slowly as I've thought about it and come across images and symbolism that I've wanted to use.

I had a long narrow piece of my hand-dyed fabric and I fused down the leaf shapes into a circle shape. I like circles, they are very feminine and I find they relate heavily to my profession as a midwife - moons, cycles, pregnancy etc etc.  

The leaves are made of hand-dyed silk organza - scraps from larger pieces that I've used in other quilts.

I was also playing around with some off-cuts of a hand-dyed linen table cloth, those are the funky shapes under the circle, but they didn't make the cut and got put back in the scrap bin.

I spent the Christmas holidays doing embroidery using my hand-dyed threads. I tried to use a different stitch for every type of leaf just to up the interest factor, but also to add some cohesion between the groups. I still had no idea what I was going to do with the panel, but ideas started flowing as I sat and stitched.


I cut a large piece of hand-dyed cotton in half and sewed one half to each side of my middle panel. I wanted to increase the size because I'd finally had an idea of what I wanted to add.


This beastie hangs on a wall under my house where I used to dye my fabrics. My husband is very proud of his 12 point red stag, and skulls have a lot of symbolism for me too. I particularly like the way the antlers curve back towards each other - what could they be circling and holding within them?


To offset the grimness of the skull and to constrast masculine and feminine ideas, I fussy cut a preloved tea cloth for the bone.

It looked very flat until I began adding the highlight stitching. I use my quarter inch foot on my Bernina 440 when I'm doing detail stitching and raw-edge applique, as it's nice and narrow and I can use the inside of the foot to help me eyeball where the line of stitching should go in relation to the edge of the fabric. 


But I'm getting ahead of myself. Before I stitched the skull, I used paint and stencils to add vines, then I used silk organza to add another layer of vines, some with vicious thorns. Vines for the curves, thorns for the contrast.


I also used paint and stencils to add a flight of birds curving up and around, another circle.


And now I'm up to the quilting. You may have noticed that I haven't shown an image of the whole flimsy before quilting. I've decided that I want to keep in secret and not show the whole until I'm done. I'm not sure why but bear with me!

You can see a little more in the video of me quilting one of my thorny vines.


Happy stitching everyone!

Tuesday, May 5, 2020

100 days of Horoeka/Lancewood

This will be my fourth 100 days project. I'm not sure what draws me to doing these. I know I'll get frustrated at some point. I know I'll 'cheat' at some point (cheating is irrelevant when it's my project and I can do it how I like). I know I'll think what I'm doing is dumb and want to change it. But here I am, doing it anyway even though I know all of that.

Because I also know that there will be times I really enjoy it, and there'll be times when I love what I've done, and times when a flash of inspiration or a new idea makes it all worth it.

And besides, I'm the one running it for Aotearoa Quilters, so I kinda have to do it now!

So what is my project this time around? 100 days of Horoeka, which is te reo for the lancewood tree. Or Pseudopanax crassifolia if you want Latin. I'm also including Pseudopanax ferox, also known as the savage or fierce lancewood. How could you not be fascinated by a tree named savage?

The lancewood is a funky NZ native that completely changes it's appearance between juvenile and adult forms. So much so that at one time they were thought to be a separate species. Juveniles have long, strap like toothed leaves that hang downwards, usually dark in colour with a thick yellow/orange midrib. Once they get above moa browsing height, about 3 metres, the tree begins to branch, and the leaves become shorter, rounder, less toothed and lose the coloured midrib.

Here's my first three days:

https://drive.google.com/uc?export=view&id=1lu-IrhYR2aOWnS0N-tBFEW2CtFLb_J6a

I wrote text about lancewoods onto my base fabric the first day, cut out an organza lancewood the second day and sketched a lancewood onto my base fabric the third day.

https://drive.google.com/uc?export=view&id=1tzQeHzoCahNzHy2lH0vn_IU5cFEKkabP

I'll also be working in a sketchbook for when life doesn't accommodate fabric work. Here's day 4 (today) where I worked in my book that I made specifically for this project. I haven't attached the covers yet, that'll probably come as one of my days of the project.

I've already discovered that I have quite wide parameters for this project. Yes, I'll be working with some aspect of lancewoods everyday, but that leaves it really open and sometimes I have difficulty deciding what exactly to do. I might need to brainstorm a list so I can refer to it when I'm trying to narrow my choices.

Sunday, May 3, 2020

Poetry

I had occasion to read this poem out at a ceremony the other day. It's always spoken to me and I thought it might speak to you too.


The Peace of Wild Things 
by Wendell Berry

When despair for the world grows in me
and I wake in the night at the least sound
in fear of what my life and my children’s lives may be,
I go and lie down where the wood drake
rests in his beauty on the water, and the great heron feeds.
I come into the peace of wild things
who do not tax their lives with forethought
of grief. I come into the presence of still water.
And I feel above me the day-blind stars
waiting with their light. For a time
I rest in the grace of the world, and am free.

https://drive.google.com/uc?export=view&id=1bPtk_yZVz7cXQzYY1DF8M-lBeqeIknEW