My name is Charlotte, sometimes known as Ms Lottie, occasionally as The Slightly Mad Quilt Lady. This is my blog, where you'll find me writing a lot about my quilting and textile arts and a little about my family's life in a small seaside town in New Zealand. Haere mai!
Showing posts with label wheat flour resist. Show all posts

Monday, February 25, 2013

Results of my wheat flour resist play


So later in the day, my fabric (previously covered in wheat flour resist) was dry.  And there I learnt my first lesson.  Pin down the edges of your fabric really well.  It curls as it dries and if the edges curl too much it's hard to paint.

On my first piece I painted the shapes with runny fabric paint.  I had some turquoise Jacquard Dynaflo, which is quite liquid and I added a little black Jacquard textile paint to darken it.  I crackled the unpatterned part of the fabric and painted those marks too.


On my next piece I painted household bleach.  Uh oh.  Nothing happened.  This was hand dyed fabric, dyed with procion MX dyes so I just assumed it would dishcharge.  But I didn't do what Jane Dunnewold says to do - TEST YOUR FABRIC!  

I didn't want to lose my written pattern, so I painted over the bleach with some slightly diluted purple fabric paint.  I'm cutting that section off in the above photo because I wanted to wash the plain bleach section off.  You need to leave the fabric painted pieces to cure for 24 hours seeing as you can't iron them to heat set them.


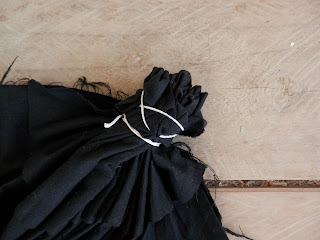
I thought the lack of reaction to bleach may have been because my bleach was too old.  I have a worm septic system, and worms and bleach don't go well together so I don't use bleach very often.  So I folded, tied and dipped some commercial black homespun in the bleach.  Nope, my bleach was fine.  Instant reaction.


And it ended up a really neat piece of fabric!  It's just been rinsed in vinegar water in the pick above.  Vinegar neutralises the bleach and then I put it through a rinse cycle in my washing machine.


And here is a closer pic when it's been dried and ironed (ish!).


So here is my first fabric paint piece.  Nice crisp patterning with a few crackly bits.  The crackle section is interesting too.  I was a bit nervous about crackling it too much, but I could have been a bit more vigorous.


You can just see a faint pattern from my bleach discharge.  Lesson learnt - test your fabrics.  


 And here is the writing piece.  Nice texture.  Doesn't really look like words!  I think my paste was a bit goopey and thick.  I might try again with a thinner coat of paste and I might try with cornflour paste - less gluey.

For all that effort, I question whether I could have got similar marks from stamping.  Probably with the square/circle marks.  But I can't get the crackle or the writing texture - unless I want to start playing with batik and wax - so I think it's worth it for those sorts of textures and I'll stick to using it for that.

But fun was had and that's the most important part!

Sunday, February 24, 2013

Wheat flour resist on fabric 1 (and given up resisting a self-portrait)

I realise I haven't got many photos of me on this blog - my excuse is that I'm the one behind the camera.  But I can hold the camera and take a photo of myself, it's not that hard.  And I figure I'm getting a bit old for the self-conscious, avoid photos at all cost act.    So that's me folks, getting ready for some surface design play!  


I was out for a walk this morning when Hubby drove by with the kids in the car - he was taking them off for a couple of hours - excellent!!  I almost ran back home because I'd had this surface design trial in mind, but I wanted to do it unassisted by children.  I'm a mess magnet at the best of times, and this promised to be a disaster if the midget mess-magnets helped too.


It's a sunny day so I decided to work outside to keep mess to a minimum.  I pinned out my bits of hand-dyed fabric out on a polystyrene sheet, and spread out my reference book.


Are you looking for an excellent surface design book?  Art Cloth:  A Guide to Surface Design for Fabric by Jane Dunnewold, you won't regret it.  There are soooo many things in here I want to try.


Today I was trying a wheat flour resist.  It's easy - mix up flour and water.  I started with a cup of plain white wheat flour.  I ended up using about 3/4 cup of cold water.  You want a batter-like consistency.


I don't own a squeegee so I used an old credit card!  Pin your fabric at one end, smooth a thin layer over the fabric and then pin down the other sides.  Lumps are a bit of a problem, so keep your batter as lump free as possible.


So when they are nicely covered you can get to work making marks in the resist.  I had plenty of resist left over after covering the fabric.  My fabric size is probably a bit more than a fat quarter.


Hubby owns an engineering shop - very convenient for pipe off cuts!


I wrote in it using the blunt end of a kebab stick.  I think my resist layer was a little thick - it wasn't as easy or as clear as I thought it would be.  I was going to wait and try more writing when it had dried a little more, but I forgot.


I learnt to have a rag handy for wiping your stamp off between stamps.  If you don't, the print gets bigger and more uneven as the goop layer on the stamp gets thicker and picks up more of the resist.  You can see that happening above with the row of circles stamped from left to right.


All stamped and done.  I left some blank areas to play with the 'crackle' effect where you scrunch it up once it's dry and then your dye/paint/discharge mix goes in the crackle lines.

Now it has to dry completely.  Tomorrow I'll be doing the next step.  Stay tuned!