My name is Charlotte, sometimes known as Ms Lottie, occasionally as The Slightly Mad Quilt Lady. This is my blog, where you'll find me writing a lot about my quilting and textile arts and a little about my family's life in a small seaside town in New Zealand. Haere mai!
Showing posts with label free-motion quilting. Show all posts

Wednesday, September 9, 2020

Teaching Tour - the new BERNINA Q16

In my last blog post I hinted that there was an upcoming teaching tour with BERNINA. It's all confirmed so now I can give you all the deets and make it all official and stuff. 

BERNINA have released a brand new machine. It's another sit down long-arm with all the great features of the BERNINA Q20 but it's just a little smaller. Welcome to the new BERNINA Q16! This is perfect for those quilters who need more throat space than a domestic to make quilting their quilts a breeze, but don't have quite enough sewing room space for the larger machines. It's also just a bit easier on the budget. 

And I'm so excited to be able to help BERNINA introduce it to New Zealand!


BERNINA  asked me to design a fabric panel specifically for this class. I've used my own hand-dyed fabrics and put together a design that isn't too complicated but still has plenty of scope to get creative with the quilting designs. Rebecca Owen from BERNINA worked her digital magic and put the squared border around it and has got a panel printed for every workshop participant. 


You'll be able to try out free-motion and ruler quilting on the beautiful Q16 machine and will get to take your very own ruler home with you - as well as your quilted sample of course. The panel will be sandwiched, the machines will be threaded, all you have to do is sit down and have a creatively fun time with me and the BERNINA crew!

It's a great opportunity to have a really good try out session with the Q16. I know it can be a bit overwhelming at a show with everyone watching and other people waiting to have their turn too. At this workshop every class participant will have their own machine and during the three hours I'll be able to guide you through some beautiful free-motion and ruler quilting designs, which you can combine to really make the panel your own.

If you are interested in joining us, please get in touch with your local BERNINA dealer. I look forward to seeing you there, it's going to be so much fun!

Edited to add the timetable:


Monday, August 31, 2020

I'm a BERNINA Q 20 Ambassador for New Zealand!

It’s been seven weeks since my new baby came to live with me….my new BERNINA Q 20 sit down long-arm quilting machine!


The BERNINA Q 20 is a quilting machine with a 20 inch throat. You sit on a chair to use it and guide the fabric under the needle, just like free-motion quilting on a small domestic machine. You can also put the Q 20 on a frame and use it like a stand up long-arm, where you guide the machine over the fabric. BERNINA also makes a Q 24 (with a 24" throat) that is specifically designed to be used in a stand up frame.


I have been a BERNINA convert since I bought my first ‘real’ sewing machine 15 years ago – a BERNINA Aurora 440. BERNINA stole my heart with the quality of their machines, the beauty of the stitches and the ease of use. So when the lovely crew at BERNINA NZ contacted me and asked if I’d consider becoming a BERNINA Ambassador for them, you can guess what the answer was…hellooooooo dream role!


My role as an ambassador is to share my experiences using the machine, to publicise any neat and unique features that I particularly love and to basically 'share the love' by showing you all what I create with the machine. You might also see me sometimes at shows where BERNINA has a stand (cool! I love demoing) and perhaps even doing a teaching tour or two.


*Sneaky advance notice - teaching tour coming up in October - watch this space!*


So here’s me sharing the love with pictures of the day she arrived.


Nick and Sandy came up from BERNINA Sewing Centre in Whangarei to deliver and install the machine for me. They were equally excited for me, and so helpful, with lots of tips.


My Q 20 sits in a Horn table. These tables have been designed particularly for this machine as an option for smaller spaces; they are large and pretty robust tables, but foldaway (with the machine still on them) for effective space saving. Nick tells me that most people opt for these tables now, but there is also the choice of a Koala table; a very solid table that has the option to expand larger than the Horn.


Apparently in the U.S. you can get fancy electric tables that lift up and convert from seated height to standing height. I’ll keep my eyes peeled to see if they ever come to NZ.


Anyhoo. Back to installation day. I was shown how to use the machine, how to set my bobbin tension with the nifty little tension gadget, how to oil and clean her (super easy), and how to use the fancy-pants needle threader. Then it was practice time. 


With any new machine it takes time to get to know it. For example, it took me a little while to get my movements coordinated with using the kickback on the foot pedal to lift the needle and then the button on the screen to lift the foot because it’s a different set of movements from my other machine. But once you get quilting, the free-motion movements are all the same and it just flows like silk!


It has also taken me a little while to get used to the BSR – the BERNINA stitch regulator function. My BERNINA Aurora 440 has a BSR, but I never really use it. When I first bought that machine, I was just learning to free-motion quilt and it felt like learning to use the BSR was just as much effort as learning to free-motion without it. Over the years I have mastered free-motion quilting and can easily regulate my stitch length without needing a BSR. But I was determined to try it and get to know it well on the Q 20 – if I’m ever going to be demoing the machine I have to know what I’m talking about, right?!


And now I LUUUUURVE it! She has three BSR modes. BSR 1 regulates your stitch length to the speed you move the fabric but also stitches in place when you stop moving the fabric. BSR 2 is the same as BSR 1 but with no idling stitching. BSR 3 is a basting stitch, which you can set to do one, two or four stitches per inch. I’m looking forward to trying the four stitches per inch with a heavy thread to imitate big-stitch hand quilting.


The BSR helps with keeping the quality of my stitches beautiful. It really helps with ruler quilting, which I’m just starting to explore, and it just makes life a little bit easier, giving you more energy to spend on creating beautiful quilts rather than worrying about stitch length. 


If you follow me on Instagram, you will have seen many of my practice pieces. I’ve made several bassinet quilts, as they are a good size for practice sandwiches, and then I can donate them to the maternity unit once they are finished. I've also been working on some smaller projects with intensive quilting, like the swallow below.


But yesterday I finished a little sample that I made entirely on the BERNINA Q 20. It’s a wholecloth quilt, thread sketched, then coloured with water soluble pencils, and fixed with a textile medium. I call it Dragon Moon.
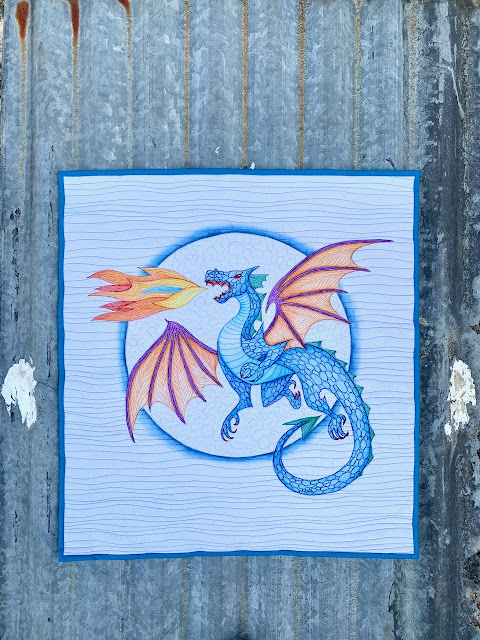


Size is 18 1/2 inches wide by 20 inches tall. It's intensively stitched, but the BERNINA Q 20 handled that with ease. 


Here's the back. I thought it would be interesting to use black fabric to give it a totally different look. I usually use the same colour threads top and bobbin so I almost get a two-sided quilt.


And a couple of detail shots for you. My meandering on the moon looks a little odd closeup, but I was trying to go for an irregular pocked moon surface, rather than a beautifully even meander, not quite sure I achieved it! I'm super happy with the scaling pattern on the body, and the pattern I used on the wings (although I didn't get much of a closeup of that.)


In conclusion, I'm delighted with the machine. She is lovely to use and creates a lovely stitch, just like I've come to expect from BERNINA. I'm really excited to be able to be part of the BERNINA family and I look forward to being able to show you all the projects I create with the Q 20. 


P.S. Next time I'm asked to fill in my occupation on a form, do you think I could get away with writing 'Ambassador'?!

Tuesday, June 9, 2020

Skulls and Thorns

When I last spent some time writing in my blog, we were moving out of Level 4 lockdown for the Covid-19 pandemic, so it's quite fitting that now, when I've taken up my pen keyboard again, it is the first day of Level 1. New Zealand has NO active cases!

My desktop died a sad and sudden death a few weeks ago and that really put a halt to my intended regular blogging activity. I can do it on my other devices but it just isn't fun.

Anyhoo, here I am once again.

I have a video for you today. A little free-motion quilting video that I shot yesterday. It's fun videoing myself quilting, I like watching myself and figuring out how I could improve my own skills, or how I could better teach others from what I'm saying and pointing out.

The quilt I'm quilting is one I've been working on off and on for a little while. It started as a hand-stitching project and has evolved slowly as I've thought about it and come across images and symbolism that I've wanted to use.

I had a long narrow piece of my hand-dyed fabric and I fused down the leaf shapes into a circle shape. I like circles, they are very feminine and I find they relate heavily to my profession as a midwife - moons, cycles, pregnancy etc etc.  

The leaves are made of hand-dyed silk organza - scraps from larger pieces that I've used in other quilts.

I was also playing around with some off-cuts of a hand-dyed linen table cloth, those are the funky shapes under the circle, but they didn't make the cut and got put back in the scrap bin.

I spent the Christmas holidays doing embroidery using my hand-dyed threads. I tried to use a different stitch for every type of leaf just to up the interest factor, but also to add some cohesion between the groups. I still had no idea what I was going to do with the panel, but ideas started flowing as I sat and stitched.


I cut a large piece of hand-dyed cotton in half and sewed one half to each side of my middle panel. I wanted to increase the size because I'd finally had an idea of what I wanted to add.


This beastie hangs on a wall under my house where I used to dye my fabrics. My husband is very proud of his 12 point red stag, and skulls have a lot of symbolism for me too. I particularly like the way the antlers curve back towards each other - what could they be circling and holding within them?


To offset the grimness of the skull and to constrast masculine and feminine ideas, I fussy cut a preloved tea cloth for the bone.

It looked very flat until I began adding the highlight stitching. I use my quarter inch foot on my Bernina 440 when I'm doing detail stitching and raw-edge applique, as it's nice and narrow and I can use the inside of the foot to help me eyeball where the line of stitching should go in relation to the edge of the fabric. 


But I'm getting ahead of myself. Before I stitched the skull, I used paint and stencils to add vines, then I used silk organza to add another layer of vines, some with vicious thorns. Vines for the curves, thorns for the contrast.


I also used paint and stencils to add a flight of birds curving up and around, another circle.


And now I'm up to the quilting. You may have noticed that I haven't shown an image of the whole flimsy before quilting. I've decided that I want to keep in secret and not show the whole until I'm done. I'm not sure why but bear with me!

You can see a little more in the video of me quilting one of my thorny vines.


Happy stitching everyone!

Monday, October 15, 2018

Piwakawaka in Dappled Light

I remember spending a lot of time in the bush as a kid.  We lived on a 15 acre block that had lots of regenerating native bush and some huge old macrocarpa trees and we would run around and climb trees and play games and explore.

There's a special kind of light that hits the forest floor through the undergrowth.  It's green and bright and dark and soft all at the same time.  And that's often where you'd find the fantails, or piwakawaka, hanging out.  They are bug eaters and I guess they can see the bugs better in the shafts of sunlight.  They used to follow us, eating the bugs that we would stir up with our passage through the branches.


I started this quilt with a reverse applique.  The positive cut out of the dark grey leaves got used for another quilt, but I had cut them out of a big piece of fabric so I could use the negative shape too.  I placed some bright green hand-dyed fabric behind the grey fabric and fused it place.


Next came an overlay of silk organza to tone it down a bit and tie it together.  I stencilled a few fern fronds (the burgandy and the white one) onto the silk overlay to go with the light green fronds that are underneath.


The fantail shapes are a pinky fabric underneath the overlay.  The overlay is mostly green but had some blue in that upper region and I wanted to pick that up and get some warmth into that top corner so pink birds plus blue overlay equals a little bit purple.

I added some coloured pencil detail to the birds before I sandwiched everything together and began quilting it.  I began with the shapes that would create a foundation - a circle (marked with a mixing bowl) and the outlines of the leaves, fronds and birds.


I even recorded a little video of some of the free-motion quilting I did on one of the fern fronds.  I mistakenly call it a nikau frond in the video - who knows why!


If you follow me on Instagram (find me here), you will have seen the bottom photo of the fantail quilting in progress.  I wanted to convey the funny way the birds dart and flit and circle and almost seem to play, but are actually hunting and feeding.  


And here they are finished.  I had a lot of fun doing the 'graffiti' quilting.  Free-form flowy shapes, a few pebbles and paislies thrown in to fill up the corners.


I used an organic straight line background texture for the rest of the quilt.  It pushes the background back nicely and provides a good contrast in texture to the quilting inside the circle.  I varied the colour of the thread to help convey the dappled light feeling.  The photo above is taken in very strong side sunlight to show you the texture.


I'm not entirely sure of the quilt's name yet.  But I had better decide quickly as it will be on display and for sale at KOAST this coming weekend!

Sunday, July 30, 2017

In Praise of The Humble Stipple

I don't know why stippling (or all-over meandering) gets such a bad rap.  It's a free-motion quilting pattern that has got a whole heap going for it and we really shouldn't knock it like we do.


I was thinking about the stipple because I decided to use it, and using it reminded me of why I like it. 

Here's why I'm celebrating the humble stipple today:

  • Stippling fills an area quickly.
  • The pattern gives a really nice overall texture.
  • It's the type of pattern that looks good stitched out big, small, or anywhere in between.
  • Stippling is an excellent practice stitch because you need good 'flow' to get it nice and smooth, and there is no sharp corners, which can be traps for newbies.
  • I find it easy to use to travel around the quilt top.

My art quilt pieces tend to use more organic patterns - not even patterns really - just lines to indicate texture and so are often uneven and kind of random.  But when I'm stitching a more traditional quilt, the stipple gets a look in.

Here's a detail from one of my art quilts with a 'texture' quilting pattern to indicate the tree line in the distance.

Our quilt guild makes donation quilts - we call them community quilts - and most of them get given to Women's Refuge (a women's shelter to help women and children trying to get out of violent situations).  The one below was made and basted by several other group members and I've taken on the task of quilting it.


So I'm using it as a bit of a practice piece, with the intent of filling every block with a different free-motion filler.  And of course, where do you start when looking for free-motion quilting fillers?  But with stippling of course!


The next pattern I chose was curlicues.  Another nice pattern, but compare it with the picture of stippling above.  What do you think?  The stipple gets my vote for evenness of texture.


Sure, if we use any pattern too much it gets boring.  We need to be sensible and incorporate stippling with other patterns to add variety and places for the eyes to rest and move to.  But don't discount stippling just because everyone does it.  Everyone does it for a reason - it's an excellent, and very useful quilting pattern.

So here's to you, Humble Stipple!  May you live on long in the hearts of quilters.

Wednesday, June 7, 2017

Bits and Bobs

The NZ National Quilt Symposium exhibition deadline is looming.  I'm sewing in threads and sewing down facings and hanging sleeves and I'm confident I'll finish up the quilts I'm working on in time.  But that work is all hand sewing and I'm keeping it for evenings on the boat with my family, or for snatches of time in between dinner cooking and homework.

So in the studio this past weekend (it was Queen's Birthday weekend here in NZ so we got Monday off too) I've been doing little catchup jobs.  Bits and bobs.

I put together two bassinet quilt tops and spray basted them.  A friend is running a free-motion quilting class soon and instead of practice quilt sandwiches, she suggests we use bassinet quilts made from orphan blocks.  They are a good size to practice, the orphan blocks give the feeling of working on actual blocks, and they can be donated to the maternity unit after we are done to brighten up the postnatal ward.


I really like the one above.  Very modern.  Made from half-rectangle units that I was practicing technique with (and I've put fun crocodile fabric on the back!).


I have a bit of a pink overload in my stash and some of them are really old-fashioned.  But they look sweet in a simple little quilt like this.  Must make more and use them up!

Then I used my new big pressing surface to fuse down this dragon that has been waiting in the wings.    I sell the appliqué pattern for this panel on Etsy (both PDF downloads and paper copies), but I've been wanting to update my samples for a while.  This is the second dragon I'm doing.


Here's the first updated one I did.  I can't remember whether I showed you or not, so I'll show it again just in case.  She's made from my hand-dyed fabrics and I love how she glows!


Then I found some positive/negative blocks that I had put together as samples for my Aotearoa Tote bag class but never finished into the final bag, so I finished up the free-motion quilting on them and I've sewed them together ready for straps and binding.


I chose a random wood grain pattern to quilt them with.  It's a very 'zen' pattern to quilt.  And one you can do with your walking foot too.


It's very satisfying to make progress on a whole pile of jobs.  I'm not one of those quilters who work exclusively on one or two projects until they are completely finished, but lately, with the symposium deadline coming up fast, that's what I've been doing.  It feels restricting in a way, so to rebel and take steps on a stack of different projects has soothed my spirit a bit.

In fact, I've made such good progress on all my symposium entries that I've decided to make a stab at my unrealistic symposium project.  Do you do that?  A few weeks out, decide on a project that you know will be perfect and start work on it even though you also know it will be totally unrealistic to get it finished?


Here's an Instagram pic of that project I posted a couple of days ago.  It's a little further on than that now, but still in the piecing stage.  Do you think I can do it?!  The race is on!

Sunday, April 10, 2016

More Herons, and a tease of Ungainly Grace

There is another heron quilt I didn't include in the last blog post.  It was one created for the SewEzi Aotearoa Quilters Flight Challenge, which is being exhibited as part of the Great NZ Quilt Show, the first weekend of May, in Rotorua.

I got very good news yesterday that my quilt, titled Ungainly Grace (recognise the reference to the quote in the last blog post?), was chosen as one of the twenty finalists!  Yay!

Here is the drawing I started with:


It is a sketch from one of my own photographs of a white faced heron:


Unfortunately I can't show you the full quilt yet, but I can tell you it is 75cm square, as they all will be, and I can tell you that working in a square format is difficult for me! 

 I was discussing it with my mentor (Lisa Call, in case you are looking for a wonderful teacher/life coach) and she suggested that a landscape or portrait format has instant expressiveness without even adding the art.  Think horizontal = calm, portrait = power.  But a square makes you work harder to convey the feeling you want.  You can only work with the images and layout within the square, you can't rely on the shape of the frame.  Interesting.

I can also tell you that there was hand-dyed silk and much free motion quilting on my Bernina 440 domestic machine.  


There was also much thread tying in.  Ho hum.


And there may have been a last minute dash to sew on the label in my car on the way to drop off the quilt (not while driving - just waiting for carpooling!).


But I was very happy with the final result.  It is subtle and my aim was to work with tones and get them right rather than relying on colour to do all the work.  I think I got there, but you'll have to wait till the show to see if you agree with me.


For now, this is just a glimpse.

See you at the show!

Here is a link to a great blog post written about the upcoming show - I'm biased 'cause I wrote it! 

Sunday, October 18, 2015

Last week

Last week seemed a busy one.  All my weeks seem busy at the moment - and I don't necessarily believe this is a good thing.  I don't subscribe to the 'busyness' ideal that seems to pervade our lives.  I like to have time to be slow, to enjoy, to watch and listen.  But that doesn't seem to be happening much lately.  Maybe I have to make time.

But at least I've been busy doing things I enjoy.  Well, mostly.  Housework will never go away, no matter how busy or un-busy I am.


I've been free-motion quilting this little wall hanging.  I even got most of the binding on too (let's not talk about the hanging sleeve shall we?).


I got to spend some time at the beach watching these two little loonies.  Love that expression on her face - her big brother just landed in the hole next to her after taking a flying leap.


I took a walk while they dug and snapped this pic.  We live in a truly beautiful place.  I hope I never get too busy to notice.


I spent some time appliquéing this piece of work.  I also spent quite a few hours auditioning fabrics for sky, placement of elements, thread colours etc.  But I'm glad it's finally coming together.  Once I start sewing, I can make an ever decreasing number of changes and it becomes easier to just accept it how it is, not what it could potentially be.


The dye studio has been calling my name again and I've been dyeing some skeins of thread.  These four colours got two dyeings.  The first time around I forgot to untie the loose knots I use to keep the skeins tidy, and even though they were loose, they made a stripey look - unintentional shibori.  But over dyeing worked and I managed to get my colours very close to the original ones I had.  


We were busy celebrating a birthday too.  I'm the Mum of an 11 year old!  The cake was made with almond-meal and a little coconut flour so my Hubby, who is starch-free (no grains, legumes, root vegetables etc) could eat it.  And it was delicious!  Might have been the chocolate ganache that it was smothered in...


And then I was busy tooting my horn!  New Zealand Quilter, the only New Zealand based quilting mag available, published an interview with me!  Stoked!  

It's a great issue - also featuring my good friend Mathea Daunheimer with an article on her viewer's choice winning quilt, a write up about my local quilting club, the featured blog was the blog of another quilting friend, Leeann, and there were lots of other interesting articles and pretty pictures as per usual.  Thanks NZ Quilter, and Norma Slabbert, who wrote interesting questions for me to think about.

Next week promises to be busy too.  But I'm going to be mindful of spending a few hours not worrying about what I should be doing next, just sitting and enjoying, and feeling grateful for all I have.